How to Make a Cake Topper with Cricut
Cake toppers are perfect to elevate any cake topper and making Cricut cake toppers is very easy and so much fun.
Cricut cake toppers can be made for a variety of events and occasions and you can even include cartoon characters in them or business logos for clients. I especially love that depending on the detail of your Cricut cake topper, it can become a keepsake for the person who is being celebrated or honored.
In this article, I show you how to make a cake topper with Cricut from start to finish.
What are Cricut cake toppers?
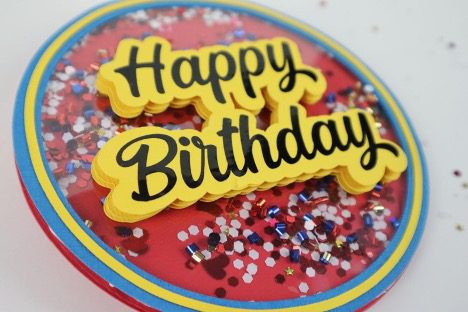
Cricut cake toppers are decorative cake centerpieces that you use your Cricut machine to make. Cake toppers add a personalized touch to cakes, making them the most eye-catching piece of any cake.
What supplies are needed for Cricut cake toppers?
- Cricut machine
- Adhesive cutting mat
- Yellow cardstock
- Red cardstock
- Blue cardstock
- Black adhesive vinyl
- Transfer tape
- Colored confetti
- Acetate
- Thin double-sided foam tape
- Double-sided foam squares
- Clear prism sticks
- Bearly Art glue
- Hot glue gun
- Scissors
Accessing and designing the Happy Birthday Cricut cake topper
Go to the Free Resource Library to download the free SVG file. Search for “Happy Birthday Cricut Shaker Cake Topper” in my Free Resource Library.
- Open Cricut Design Space and start a new project.
- Click the Upload button on the left panel and click Upload Image.
- Click Browse.
- Find the birthday cake topper on your device, select it, and click Upload.
- Click Upload Image.
- Click on the image and then click Add to Canvas in the bottom right corner.
- Your cake topper should be 5 inches in width. If it’s not, you can adjust the width to your liking.
- Click the Ungroup button in the right panel to separate the pieces of the cake topper.
You can now change the colors of the cake topper to correspond with the cardstock you intend to use.
Here’s a quick debrief on the cake topper colors: Light grey is acetate, the 3 red layers are the back layers to create the 3D effect, the blue outline circle is the layer to cover your thin double-sided adhesive foam tape, and the yellow circle is the accent that goes on top of the blue.
Cutting the Cricut Cake Topper
Once everything looks the way you want it to, click the Make It button in the top right corner.
Don’t forget to make sure your Cricut machine is turned on.
You will see your cake topper pieces sorted by color onto various mats.
Click the Continue button.
Your Cricut Design Space will connect to your Cricut machine.
Add the appropriate material to your adhesive cutting mat and choose the appropriate material from the materials list:
- To cut your cardstock, select Medium cardstock from the list of materials. I selected 65 lb Medium cardstock.
- To cut your acetate, select Acetate from the list of materials.
- To cut your adhesive vinyl, choose your adhesive vinyl type from the list of materials. I selected premium outdoor vinyl.
Add your material to your cutting mat and when your go/start button starts blinking, click that button.
Once the design is finished cutting, click the blinking unload button.
Design Space will then prompt you to begin loading your additional materials and cutting the remaining pieces of your Cricut cake topper.
Once all of your pieces have been cut, it’s time to start assembling your cake topper.
Cricut Cake Topper Tutorial
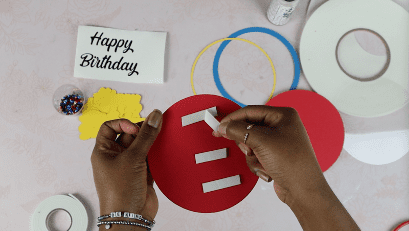
Starting with the red circles, take some double-sided foam squares, put them on the back of each red circle, and stack each of them on top of the other, getting them as centered as possible.
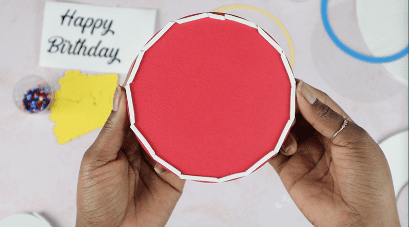
Take your thin double-sided foam tape and lay it around the edge of the topmost red layer of the cake topper. You may need to use scissors to cut the pieces. The intent is to make sure there are no openings for your confetti to fall through.
Once your thin double-sided foam tape is down, you can get your confetti and mix the colors you want inside of your shaker cake topper.
You can then peel the paper backing off of your thin double-sided foam tape.
Slowly pour your confetti within the boundary of the thin double-sided foam tape making sure none of the confetti is on top of the foam tape.
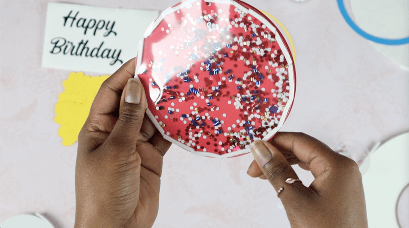
Then take your acetate, remove any plastic film on it so that it’s clear as glass, and place the acetate on top of the thin double-sided foam tape, making sure that your foam tape is completely covered so no confetti will fall out of the shaker cake topper.
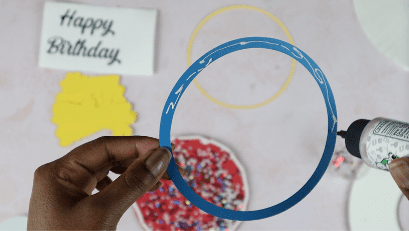
Take your blue circle outline and on the side that will go on the cake topper, put a thin line of Bearly Art glue and then press the outline onto the clear acetate. The outline should cover the thin double-sided foam tape so it’s no longer visible and you just see the confetti through the acetate.
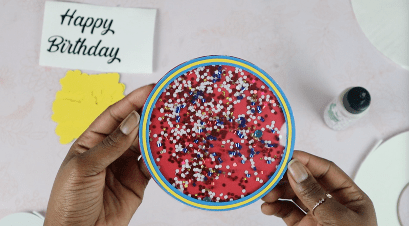
Take your thin yellow circle outline add some Bearly Art glue to it and press it onto the blue circle outline.
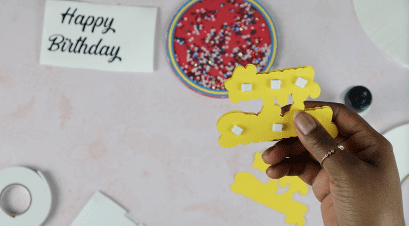
Take your offset layers for the happy birthday text and use the double-sided foam squares to assemble them, making sure each layer is as centered as possible.
Weed the happy birthday adhesive vinyl and then add some transfer tape and use your scraper to press down firmly on your words. Your transfer tape should not be super sticky or it will tear your cardstock when peeling it from the offset layer.
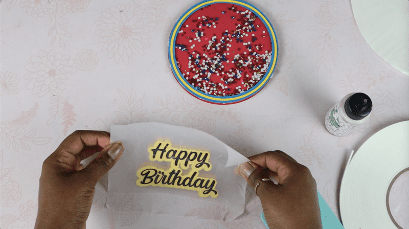
Peel the transfer tape, the words should be stuck to the transfer tape now, and then add your words to the offset background layer. You will need to press down firmly to make sure your words stick to the offset layer.
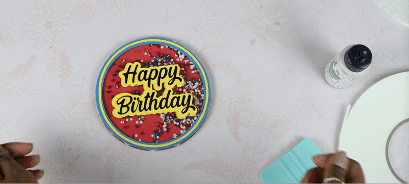
Once your adhesive layer is stuck to the offset layer, take your glue gun and use it to adhere the happy birthday 3D layer to the middle of the acetate for your shaker cake topper.
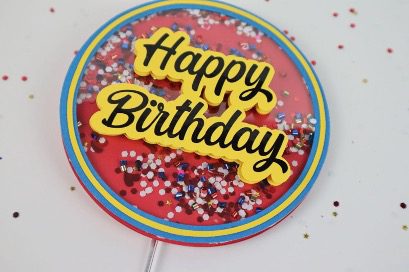
Finally, take the clear prism, put some hot glue on one side of it, and adhere it to the middle back of the shaker cake topper and you’re all done.
What is the best Cricut for making cake toppers?
You can use any Cricut machine to make Cricut cake toppers, but I would recommend you not use the Cricut Joy or Cricut Joy Xtra to make certain size cake toppers. These Cricut machines are small so depending on how large you want your cake topper to be, you may not be able to make it on the Cricut Joy or Cricut Joy Xtra.
All other Cricut machines including the Cricut Venture, Cricut Explore Air, and Cricut Maker will be able to make cake toppers.
What materials are cake toppers made of?
There are many types of cake toppers that you can use your Cricut machine to create and decorate. Cake topper options include acrylic, wood, and cardstock. While you can’t cut acrylic with any Cricut machine, you can still use your Cricut machine to decorate the acrylic cake topper by cutting vinyl, fabric, cardstock, etc. I use round and hexagonal acrylic cake toppers on Amazon.
The Cricut Maker machines can cut cake toppers out of thin pieces of wood including bass and balsa wood if you have a deep knife blade. You can buy thin pieces of basswood, balsa wood, etc. on the Cricut website, Amazon, or Hobby Lobby.
My favorite type of Cricut cake toppers to make are those made out of cardstock. I love using cardstock to make Cricut cake toppers because your design options are endless. You can use a variety of cardstock colors and also print then cut various elements of your cake topper.
What events or celebrations can I make cake toppers for?
Any event or celebration where cake is served is an event or celebration where you can use and make cake toppers. Some common events or celebrations to create cake toppers for are birthdays, gender reveals, baby showers, weddings, anniversaries, graduations, retirements, and many more events.
What size should a cake topper be?
The size of your cake topper will vary based on the width of your cake. A rule of thumb is that your cake topper should be the same width as the topmost layer of your cake.
Where to find cake topper designs and templates?
You can find cake topper designs and templates on Etsy or Creative Market.
You can also search your web browser for cake topper templates to find other online options to purchase Cricut cake toppers. Also, don’t forget to check the projects in Cricut Design Space to see the cake topper designs that are available for free or for purchase.
Can you sell cake toppers?
Yes, you can sell your Cricut cake toppers that you make. Some of the most popular places to sell your cake toppers are on Etsy or even Amazon.
If you don’t want to sell your physical cake toppers, you can also design cake toppers and sell your design/SVG files on Etsy, Creative Market, or even your own website.
How to package cake toppers to sell?
To package your Cricut cake toppers to sell them, you will need cake topper inserts, boxes, shred, plastic bags, thank you cards, washi tape, and poly mailers. If you intend to ship your cake toppers, you will also need a shipping scale, a printer, and shipping labels.
Be sure that you don’t skip the boxes especially if you’re selling cake toppers made of cardstock. You don’t want your cake topper to arrive to the customer broken or damaged, so be sure to get those boxes and you can even print then cut some fragile labels to go on your package.
I hope you enjoyed this article on how to make a cake topper with Cricut. Check out Byrd’s other Cricut cake topper videos on her InsideOutlined YouTube channel.

