DIY We Survived 2021 Ornament
2020 is almost over (you’ve made it this far)! These homemade “We Survived 2020” ornaments will add a touch of humor to Christmas this year. You can use it with supplies from Amazon and your Cricut for some festive one-of-a-kind ornaments!

With the craziness of this year, sometimes the best thing we can do is laugh it off. You can make a Christmas ornament this year as a badge of honor for surviving 2020. You just need a few supplies, plus your trusty Cricut maker.
Homemade ornaments are fun to make and add a pop of personality. 2020 has been a one-of-a-kind year that calls for some one-of-a-kind celebrating. Try these ornaments this Christmas season!

Where can I get the design for this project?
This project is available right in Design Space. All you need to do is click this link, and you’ll be able to access it right away!
Can I Upload My Own Images to Design Space?
One of the best features of the Cricut is its software: Design Space. This allows you up upload your own pictures to then print out with the Cricut. You can use Santa images already in Design Space, or use one you like better and upload it to Design Space. It make customizing super easy.
Does It Matter Which Cricut Machine I Use?
The good news is that all Cricut machines cut vinyl! For this project, you’ll be printing out the Santa images onto vinyl, then transferring to the ornaments. At the end of the day, any model of Cricut will get the job done.
Tips
This project can be a bit messy. Make sure you have cups for excess glue, glitter, or paint! Also, you may want to do this over a bunch of newspapers or a disposable tablecloth. Glitter is one of those things that will get anywhere and everywhere if it can. It’s totally worth it, just be careful! Leave yourself plenty of space to do this and a little bit of time for clean-up for when it’s over.

How to Make a Homemade “We Survived 2020” Ornament
Here’s What You’ll Need:
- Clear, plastic disc ornaments
- Filler material, paint, or glitter
- Permanent vinyl
- Weeding tool
- Transfer tape
- Scissors
- Design Space Template
- If filling with glitter: Beacon Glitter It
- Funnel
- Cup (for excess glue and/or glitter)
- If filling with paint:
- Funnel
- Cup (for excess paint)
Instructions
- Remove the tops from the ornaments.
- Pour a small amount of Glitter It into the ornament and slowly swirl around until the inside is coated.
- Remove the excess Glitter It by pouring into a cup.
- Using a funnel, pour glitter into the ornament and shake around until completely coated.
- Tap the ornament upside down over a different cup to remove excess glitter.
- If a thicker coat of glitter inside the ornament is desired, allow the ornament to dry and repeat the previous steps.
- Once the glue is dry, replace the cap.
To fill with paint: - Remove the tops from the ornaments.
- Pour a small amount of paint into the ornament and slowly swirl around until the inside is coated.
- Remove the excess paint by pouring into a cup.
- Let the ornament rest on its side or upside down overnight to dry completely.
- Once the paint is dry, replace the cap.
To decorate with template: - Open the Design Space file here
- Select to remove the background of the image (if needed) and save as a cut file.
- Insert the image into your project and select your desired print color to help organize the cuts.
- If all of the details of your ornament will be the same color, click and drag to select the elements for the ornament and select to weld the items together.
- Select the image and size to match the dimensions of the ornament.
- Cut the images from vinyl.
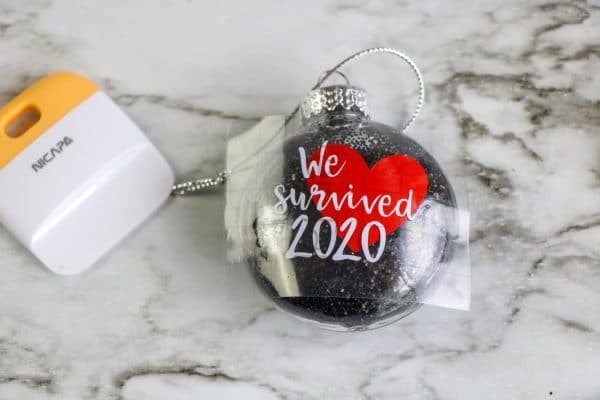
- Weed the excess vinyl away and then use transfer tape to move the designs to the ornament. Press firmly or swipe over the transfer tape with a scraper to make sure the vinyl adheres to the ornament. Pull the transfer tape away.
How-To Card

DIY We Survived 2020 Ornament
Want to make Christmas feel more cozy? Homemade ornaments are easier than you think with the Cricut—and totally worth! This Santa ornament will look great on your tree as you make Christmas more personal this year.
Materials
- Clear, plastic disc ornaments (pictured: https://amzn.to/34wXwBB)
- Filler material, paint, or glitter
- Permanent vinyl
- Weeding tool
- Transfer tape
- Scissors
- Template
- If filling with glitter: Beacon Glitter It (pictured: https://amzn.to/3oxo02P)
- Funnel
- Cup (for excess glue and/or glitter)
- If filling with paint:
- Funnel
- Cup (for excess paint)
Instructions
- Remove the tops from the ornaments.
- Pour a small amount of Glitter It into the ornament and slowly swirl around until the inside is coated.
- Remove the excess Glitter It by pouring into a cup.
- Using a funnel, pour glitter into the ornament and shake around until completely coated.
- Tap the ornament upside down over a different cup to remove excess glitter.
- If a thicker coat of glitter inside the ornament is desired, allow the ornament to dry and repeat the previous steps.
- Once the glue is dry, replace the cap.
- To fill with paint:
- Remove the tops from the ornaments.
- Pour a small amount of paint into the ornament and slowly swirl around until the inside is coated.
- Remove the excess paint by pouring into a cup.
- Let the ornament rest on its side or upside down overnight to dry completely.
- Once the paint is dry, replace the cap.
- To decorate with template:
- Open this file in design space - https://design.cricut.com/landing/project-detail/5fcc62373334400d70cef8e0
- Select to remove the background of the image (if needed) and save as a cut file.
- Insert the image into your project and select your desired print color to help organize the cuts.
- If all of the details of your ornament will be the same color, click and drag to select the elements for the ornament and select to weld the items together.
- Select the image and size to match the dimensions of the ornament.
- Cut the images from vinyl.
- Weed the excess vinyl away and then use transfer tape to move the designs to the ornament. Press firmly or swipe over the transfer tape with a scraper to make sure the vinyl adheres to the ornament. Pull the transfer tape away.
Other Fun Crafts You May Enjoy
- 30+ DIY Dollar Tree Christmas Decor, Crafts, and More
- What DIY Projects Can I Make with My Cricut? 50+ Creative Ideas
- 20+ Festive Cricut Christmas Shirt Ideas
- DIY Ornament Christmas Tree + More Dollar Tree Christmas Projects
- DIY Cactus Christmas Ornament + Free SVG
- A Cricut Christmas Gallery- Free Design Space
Congrats again on making it this far in 2020! Take a little time to yourself to craft these ornaments for Christmas this year!

